I was upgrading a server with Postgres v8.4 to v9.3 and ran into an issue when I tried to import the data that I had dumped before the upgrade. After doing a little digging, I found a way to update it without dumping the whole database and reloading it.
Here are my full instructions for doing so on RHEL 6.5. Follow them at your own risk.
*See the Installation Guide to install PostgreSQL 9.3
yum install postgresql93 postgresql93-devel postgresql93-contrib
vi /etc/init.d/postgresql
Note the following variables (examples given)
PGVERSION=8.4.20
PGENGINE=/usr/bin
PGPORT=5432
PGDATA=/var/lib/pgsql/data
PGLOG=/var/lib/pgsql/pgstartup.log
vi /etc/init.d/postgresql-9.3
Change PGPORT=5432 to 5433
Note the following variables (examples given)
PGVERSION=9.3.5
PGENGINE=/usr/pgsql-9.3/bin
PGPORT=5432
PGDATA=/var/lib/pgsql/9.3/data
PGLOG=/var/lib/pgsql/9.3/pgstartup.log
Run initdb
service postgresql-9.0 initdb
su postgres
/usr/pgsql-9.3/bin/pg_upgrade -b /usr/bin -B /usr/pgsql-9.3/bin -d /var/lib/pgsql/data -D /var/lib/pgsql/9.3/data
You should see the following:
#Upgrade Complete
#----------------
#Optimizer statistics are not transferred by pg_upgrade so,
#once you start the new server, consider running:
# analyze_new_cluster.sh
#
#Running this script will delete the old cluster's data files:
# delete_old_cluster.sh
#
[root pgsql]# su postgres
bash-4.1$ /var/lib/pgsql/analyze_new_cluster.sh
bash-4.1$ /var/lib/pgsql/delete_old_cluster.sh
Remove the old version of PostgreSQL
yum remove postgresql
This will also remove postgresql-contrib and postgresql-server
Set up your path
[root ~]# cd /usr/bin
[root bin]# ln -s /usr/pgsql-9.3/bin/psql
Optionally
export PATH=$PATH:/usr/pgsql-9.3/bin
vi /etc/init.d/postgresql-9.3
Change PGPORT=5432
service postgresql-9.3 start
psql --username=postgres
su postgres
psql
\list
You should now see a list of databases on your server.
Thursday, October 16, 2014
Thursday, July 24, 2014
Airodump CSV Tools
I've been busy working on a program that merges and parses CSV files generated by Airodump-ng. After many hours of coding, I think I am ready to release a beta.
Features:
Features:
- Merges the CSV files into one CSV file, html file, or text file, keeping the APs and Stations together.
- Has options to only show APs and Stations that are new or old in the last file you import.
- Optional text output for cron, etc.
- Adds manufacturer info (OUI) to APs and end devices, and the ESSID (if applicable) to end devices, in text/html output modes.
Sunday, May 11, 2014
Certificate Validation
Note: I also have this posted on my web site here.
How can you be certain that the connection to your bank or online vendor is secure? Well, you can't, but there are some simple steps you can take to increase the odds that your connection will be secure.
When you go to a secure web site, your browser will give you some information about the security protocols used, which you can use to judge the level of security provided.
In order to understand this process, it is necessary to understand how public key certificates work. There are many articles available on the subject that go into much more detail (Wikipedia's article can be found here). The important part to know is that anyone can create a certificate and sign it, so you have to know that the certificate is signed by someone you can trust.
This is where things get messy. Currently, the way your web browser knows who to trust is, it has a list of known trustworthy certificates that come pre-installed. You can create your own certificate and have it signed by one of the companies providing those certificates (for a fee, usually). So what it boils down to is, when you go to a secure web site, your browser will say it's secure because the certificate authority that someone paid to have their certificate signed says it's secure.
You may be wondering if it's possible to get one of those companies to sign a fraudulent certificate that you've created. While in some circumstances, that is possible, the certification authorities take steps to ensure that when you buy a certificate, you are the owner of the domain that the certificate is for.
Let's take a look at a certificate in the Firefox web browser. To get started, go to a secure web site and click on the lock icon next to the address bar.

Firefox tells you which certificate authority verified the certificate. Click on More Information.

Here you will see some statistics and information about the type of certificate being used. Click on View Certificate.

This is the important part. It tells you everything you need to know about the certificate your browser has decided to trust (or not). If the Common Name (CN) doesn't match the URL you typed into the address bar, or the validity dates are incorrect, your browser will not trust the certificate. If those details are correct, but your browser still doesn't trust the certificate, then the certificate was signed by an authority that your browser doesn't recognize.
Now let's look at a site with an untrusted certificate. If you go to a web site that Firefox doesn't trust, you'll be greeted with this warning:

Click Add Exception, and then you can view the certificate.

I used StartCom to verify my web site, but some versions of Firefox don't recognize it. Notice that Firefox will tell you the reason why it doesn't trust the certificate at the top.
If the certificate isn't signed by a recognized authority and you still want to know if you can trust it, you can compare its fingerprint to a known fingerprint for that web site. Mine is listed at this page. It's recommended, if you're going to do it this way, that you get the fingerprint over the phone, in person, or in some other more secure manner. The last four to six characters should suffice.
How can you be certain that the connection to your bank or online vendor is secure? Well, you can't, but there are some simple steps you can take to increase the odds that your connection will be secure.
When you go to a secure web site, your browser will give you some information about the security protocols used, which you can use to judge the level of security provided.
In order to understand this process, it is necessary to understand how public key certificates work. There are many articles available on the subject that go into much more detail (Wikipedia's article can be found here). The important part to know is that anyone can create a certificate and sign it, so you have to know that the certificate is signed by someone you can trust.
This is where things get messy. Currently, the way your web browser knows who to trust is, it has a list of known trustworthy certificates that come pre-installed. You can create your own certificate and have it signed by one of the companies providing those certificates (for a fee, usually). So what it boils down to is, when you go to a secure web site, your browser will say it's secure because the certificate authority that someone paid to have their certificate signed says it's secure.
You may be wondering if it's possible to get one of those companies to sign a fraudulent certificate that you've created. While in some circumstances, that is possible, the certification authorities take steps to ensure that when you buy a certificate, you are the owner of the domain that the certificate is for.
Let's take a look at a certificate in the Firefox web browser. To get started, go to a secure web site and click on the lock icon next to the address bar.
Firefox tells you which certificate authority verified the certificate. Click on More Information.
Here you will see some statistics and information about the type of certificate being used. Click on View Certificate.
This is the important part. It tells you everything you need to know about the certificate your browser has decided to trust (or not). If the Common Name (CN) doesn't match the URL you typed into the address bar, or the validity dates are incorrect, your browser will not trust the certificate. If those details are correct, but your browser still doesn't trust the certificate, then the certificate was signed by an authority that your browser doesn't recognize.
Now let's look at a site with an untrusted certificate. If you go to a web site that Firefox doesn't trust, you'll be greeted with this warning:
Click Add Exception, and then you can view the certificate.
I used StartCom to verify my web site, but some versions of Firefox don't recognize it. Notice that Firefox will tell you the reason why it doesn't trust the certificate at the top.
If the certificate isn't signed by a recognized authority and you still want to know if you can trust it, you can compare its fingerprint to a known fingerprint for that web site. Mine is listed at this page. It's recommended, if you're going to do it this way, that you get the fingerprint over the phone, in person, or in some other more secure manner. The last four to six characters should suffice.
Thursday, January 30, 2014
Results of running forensic software with Chrome Incognito
I worked at a company that makes forensics software and was interested in
seeing if it could pick up Incognito browser history. I opened Firefox
and set it to "not remember any history," then cleared the history and
browsed to a few web sites. I also tried this with a private browsing
tab, and with Chrome in an Incognito tab. Then I took an image of the
hard drive and loaded it into our forensics software. The web sites I
visited did not show up. I also checked for other traces (e.g. images
from the browser cache) and did not find anything.
I also used a hard drive hex viewer and did a string search for a couple of the web sites I went to, and they weren't on there. So the browser developers appear to have done their job in keeping browser history off of your hard drive.
I also used a hard drive hex viewer and did a string search for a couple of the web sites I went to, and they weren't on there. So the browser developers appear to have done their job in keeping browser history off of your hard drive.
Subscribe to:
Posts (Atom)
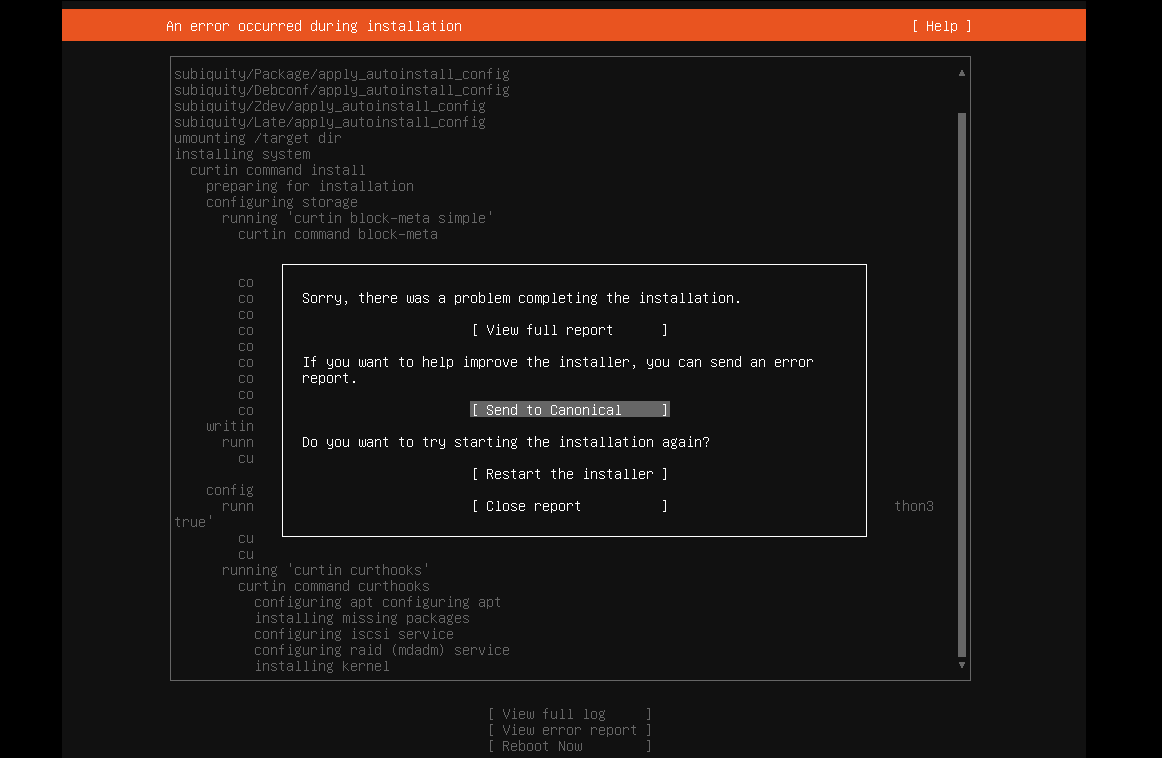
Ubuntu 22.04 on VMware Workstation Error
I tried installing Ubuntu 22.04 server on VMware Workstation and got this message: Sorry, there was a problem completing the installation E...
-
We have a customer at work that runs Dentrix. They have 4 offices, and need to have all of the patient data in one place. Unfortunately,...
-
I tried installing Ubuntu 22.04 server on VMware Workstation and got this message: Sorry, there was a problem completing the installation E...
-
I was having a problem with audio latency in VMware Workstation on my Windows 10 guest. I found an article that helped me fix it. Ever sin...
